Build Your Own MSP432 BoosterPack
Author:OMO Release Date: 2016年3月4日
DIY LaunchPad MSP430 Texas Instruments
A little while ago, Texas Instruments (TI) launched their new MSP432 family of microcontrollers. Along with the new silicon, there is also a new LaunchPad development kit. Continuing the tradition from the MSP430, the new chips are very affordable while packing in professional grade features and very impressive energy sipping performance.
Some highlights from the spec sheet:
- 48MHz 32-bit ARM Cortex M4F with Floating Point Unit and DSP acceleration
- Power consumption: 95uA/MHz active, and 850nA RTC standby operation
- Analog: 24Ch 14-bit differential 1MSPS SAR ADC, Two Comparators
- Digital: Advanced Encryption Standard (AES256) Accelerator, CRC, DMA, HW MPY32
- Memory: 256KB Flash, 64KB RAM
- Timers: 4 x16-bit, and 2 x 32-bit
- Communication: Up to 4 I2C, 8 SPI, 4 UART
- 2 buttons and 2 LEDs for User Interaction
- On-board emulator with EnergyTrace+ Technology
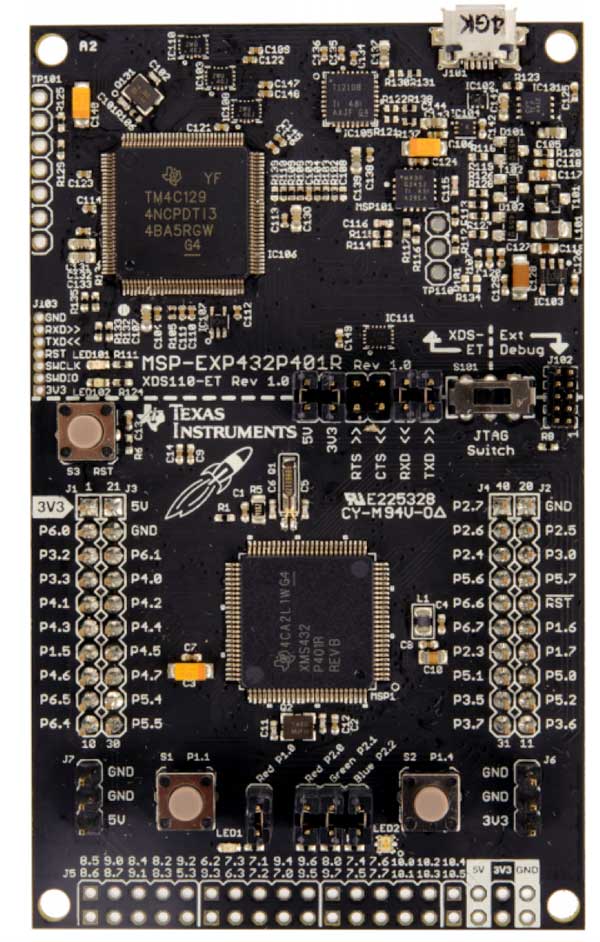
Figure 1: The MSP-432EXP432P401R Launchpad. (Source: http://www.ti.com/lit/ug/slau597/slau597.pdf)
BoosterPack header pins are once again a feature of the new MSP432-driven LaunchPads. The latest LaunchPads support both 40-pin and 20-pin BoosterPacks, making integrating additional hardware via third-party BoosterPacks incredibly easy. But what if you want to take your project from the breadboard and make a custom printed circuit board (PCB) BoosterPack?
TI has made an incredible array of resources available over at their Build Your Own BoosterPack (BYOB) website to help you make your own LaunchPad compatible board. Conveniently, all these resources are released under a Creative Commons license that allows you to create commercial derivatives, so long as attribution is given. Here are some highlights that I found exciting while using the provided tools to make my own BoosterPack.
Your Tool, Your Choice
When you have an idea for a board, the first thing you have to do is get it out of your head and into a capture tool. There are many tools available, and everyone has the favorite. TI has gone out of their to accommodate a huge spectrum of tools including Eagle, Altium, Fritzing, KiCad, and the web-based tool Upverter. My experience was using Eagle. All I had to do was download the template files, fire up Eagle, and open up the schematic and board files. It should be noted that the least expensive commercial license of Eagle will allow you to handle a board size that is well-suited for creating BoosterPacks.
Some tips for turning your BoosterPack circuit into Eagle schematic and board files:
- Be sure to tie both ground pins (pins 20 and 22) to a common ground net.
- Draw a wire off each header pin you need to use and give the wire a name and show the label. This will help keep down the wire clutter when you wire up your circuit components to the MSP432 header pins.
- Don’t forget to use copper fill with ground, this will help to add a little electrical and thermal robustness to your board.
- Trace size can vary based on the speed of the signals and the amount of current being pushed. Some recommended default trace sizes for a basic board include trace width of 12mil, drill size of 20mil, and clearance of 10mil.
- Try and keep traces as short as possible; no 90-degree turns. Also, keep filtering capacitors close to the chips they are supporting.
- When you have all the components placed and routed on the board, don’t forget to run the Design Rule Checker (DRC) and Electrical Rule Checker (ERC) one last time.
Make It A Reality
Once you’ve got your circuit board designed, it’s time to send it off to be manufactured. TI has also teamed with a variety of PCB fabrication shops, including Elecrow, SeeedStudio, and OSH Park. In addition, there is an option to get your boards populated with components through PCB Assembly Express. Sending your Eagle and/or derived Gerber files to these shops will get physical PCBs in your hands in no time.
If you think you have something people will want, you can submit your board to TI for their review. If selected, you will have your BoosterPack featured on the LaunchPad website. They will also send you a badge you can use to promote your BoosterPack. They may even mention your BoosterPack in TI forums, blog posts and select TI events.
Here’s a little bonus tip: if you do use Eagle, head over to this handy little web-based 3D board viewer and upload your board file to do a 3D rendering of your board. It will add the components if they have the component models in their database.
Don’t Forget the Software and Support
The new MSP432s are compatible with the TI workhorse Code Composer Studio. If, however, you favor the no-frills Arduino-like development environment then be sure to grab an updated version of Energia. Version 15 contains support for the latest MSP432-based LaunchPads.
One last thing, be sure to check out the Mouser Open Source Hardware Project site for a growing portfolio of cool project ideas complete with schematics, BOMs, and source code. You can find all the OSHW goodness at
